Sprinkler Valve Won’t Turn On Manually: A Comprehensive Troubleshooting Guide
Troubleshooting a non-responsive sprinkler valve demands a systematic approach, encompassing electrical checks, physical inspections, and understanding potential irrigation system issues.
Check timer settings and water supply first, then test the solenoid and inspect for blockages; proper diagnosis ensures efficient repairs and a functioning sprinkler system.
Understanding Sprinkler Valves
Sprinkler valves are the unsung heroes of efficient lawn and garden hydration, acting as electronically controlled gateways for water distribution throughout your irrigation system. These valves, typically installed underground in valve boxes, respond to signals from a timer or controller, opening and closing to regulate water flow to specific zones.
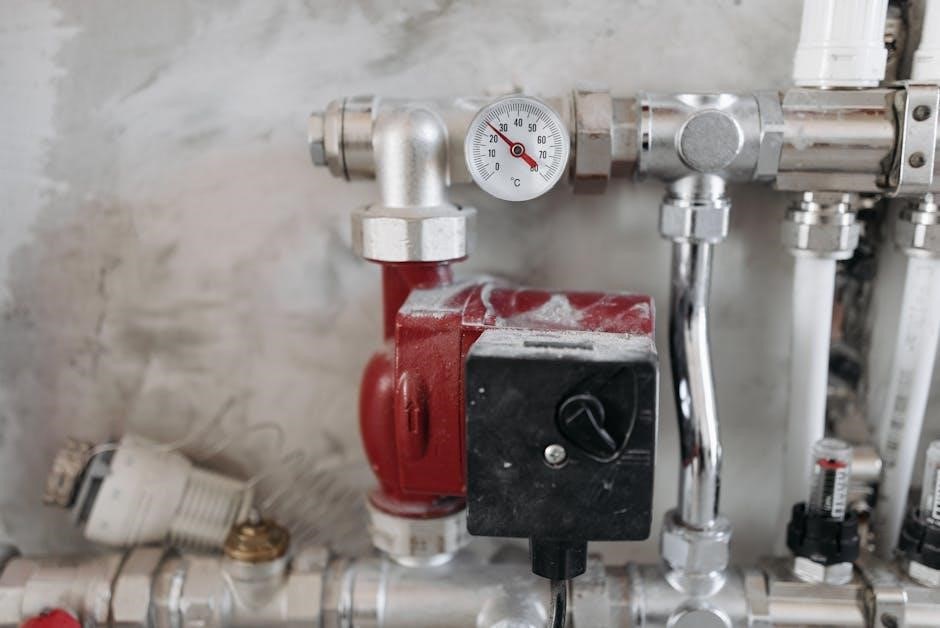
Fundamentally, a sprinkler valve consists of a body, a diaphragm or poppet, and a solenoid. The solenoid, when energized, lifts the diaphragm or poppet, allowing water to pass through. When de-energized, a spring returns the component to its original position, halting the flow. Understanding this basic mechanism is crucial when diagnosing why a valve won’t turn on manually.
Different valve types – including diaphragm, poppet, and rotary – operate on this principle but differ in their internal construction and suitability for various applications. Recognizing the type of valve you’re dealing with aids in targeted troubleshooting.
Types of Sprinkler Valves
Sprinkler valves aren’t one-size-fits-all; several types cater to diverse irrigation needs. Diaphragm valves, common in residential systems, utilize a flexible diaphragm to control water flow, known for handling debris relatively well. Poppet valves, often found in higher-flow applications, employ a spring-loaded poppet for quick on/off action, but are more susceptible to clogging.
Rotary valves, less frequent in typical lawns, are designed for larger areas and rotate to distribute water over a wider radius. Zone valves, a broader category, control individual sections of your sprinkler system; Identifying your valve type is vital for effective troubleshooting.
Knowing whether you have a diaphragm, poppet, or rotary valve influences how you approach diagnosing a “won’t turn on” issue, as each type has unique failure points and repair procedures.
Manual Operation of Sprinkler Valves
Most sprinkler valves feature a manual override, a crucial function for testing independent of the electronic timer. Typically, this involves a small, screwdriver-operated bleed screw or a lever on the valve body. Turning this screw or activating the lever forces the valve open, allowing water to flow directly, bypassing the solenoid.
Testing manually confirms whether the issue lies with the electrical components or the valve itself. If the valve operates correctly manually, the problem likely resides in the wiring, solenoid, or timer.
If it doesn’t operate manually, the issue is within the valve – a blockage, damaged diaphragm, or internal failure. Always ensure the main water supply is on before attempting manual operation.

Common Causes of Manual Valve Failure
Valve failures stem from low water pressure, debris obstructions, faulty solenoids, or physical damage to the valve body, hindering manual operation and system performance.
Low Water Pressure
Insufficient water pressure is a frequent culprit when a sprinkler valve refuses to operate manually. The valve requires adequate pressure to physically open and allow water flow; without it, the manual override may feel stuck or ineffective. Check your municipal water supply, especially during peak usage times, as neighboring demands can significantly reduce pressure.
Furthermore, a partially closed main water shut-off valve or a pressure regulator set too low can restrict flow to the entire irrigation system. Inspect the backflow preventer, as a malfunctioning unit can also cause pressure drops. Test pressure at the valve itself using a pressure gauge to confirm if it falls within the manufacturer’s recommended range. Remember, consistently low pressure can also indicate a leak elsewhere in the system, further diminishing available force.
Debris Obstruction
A common reason a sprinkler valve won’t turn on manually is blockage from debris. Dirt, sand, mineral deposits, or even small stones can accumulate within the valve body, preventing the internal components from moving freely. This obstruction hinders both automatic and manual operation. Check the valve for a filter or screen, often located at the inlet, and clean it thoroughly.
If no filter is present, carefully disassemble the valve (after shutting off the water supply!) and inspect for visible debris. Flushing the irrigation system can help dislodge loose particles, but sometimes a manual cleaning is necessary. Ensure all components are reassembled correctly to avoid leaks. Regular preventative maintenance, including seasonal flushing, minimizes the risk of future obstructions and ensures reliable performance.
Solenoid Valve Issues
If a sprinkler valve fails to operate manually, the solenoid is a prime suspect. The solenoid is an electromagnetic component that opens and closes the valve when energized. A faulty solenoid might not activate, even with power, or could be physically stuck. Test the solenoid with a multimeter to verify continuity; a reading of zero indicates a failed coil.
Check wire connections to the solenoid for corrosion or breaks, ensuring a secure connection. A failing solenoid often presents as a clicking sound but no valve movement. Replacement is typically the most practical solution for a defective solenoid, as repairs are often uneconomical. Remember to match the solenoid’s voltage and specifications to your system.
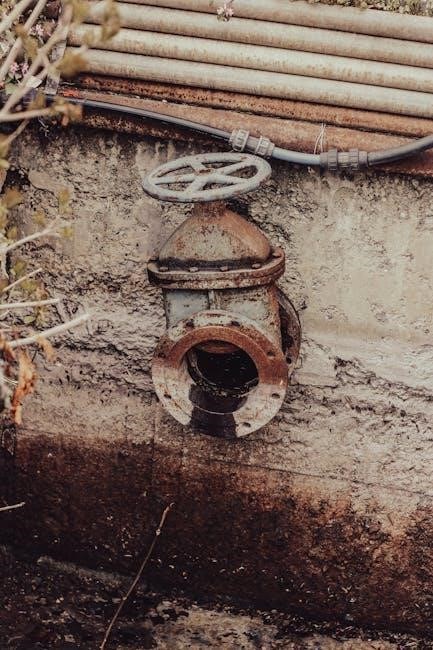
Valve Body Damage
Physical damage to the valve body itself can prevent manual operation. Cracks, breaks, or severe corrosion compromise the valve’s ability to seal properly, leading to leaks or complete failure to open or close. Inspect the valve body meticulously for any visible signs of damage, paying close attention to threaded connections and the internal seating areas.
Even minor damage can disrupt the water flow and hinder manual activation. If the body is cracked, replacement is essential; attempting repairs on a damaged body is generally unreliable. Consider the age of the valve and the extent of the damage when deciding between repair and replacement. A severely corroded body indicates a broader system issue that should be addressed.

Troubleshooting Steps: Initial Checks
Begin by verifying water supply and timer settings, then manually test the valve for responsiveness; visually inspect for damage or obstructions before proceeding.
Confirming Water Supply
Ensuring adequate water pressure is the foundational first step when a sprinkler valve fails to operate manually. Before delving into complex diagnostics, verify the main water supply to your irrigation system is fully turned on. A partially closed valve or municipal water disruption can mimic a valve malfunction.
Check for any known water outages in your area. Observe if other water fixtures in your property are functioning normally, indicating sufficient overall water pressure. If pressure is generally low, investigate potential causes like a pressure regulator issue or a clogged water meter.
Additionally, inspect the upstream valve leading to the sprinkler system itself. It’s crucial to confirm water reaches the valve in question before assuming internal component failure. A simple test is to open the manual bleed valve (if equipped) on the sprinkler valve to see if water flows freely.
Checking for Visible Damage
A thorough visual inspection of the sprinkler valve and its surrounding components is essential for identifying obvious issues. Begin by carefully examining the valve body for any cracks, splits, or physical deformities that could indicate damage from freezing, impact, or age. Look closely at the valve cover for signs of weathering or breakage.
Inspect the solenoid housing for cracks or corrosion, as this can compromise its functionality. Check the wiring connections for loose wires, corrosion, or damaged insulation. Ensure the wires are securely attached to the solenoid terminals. Examine the piping connected to the valve for leaks, kinks, or signs of previous repairs.
Pay attention to any displaced or missing parts. Visible damage often provides immediate clues to the root cause of the problem, potentially saving time and effort in more complex troubleshooting steps.
Testing for Blockages at the Valve
Blockages within the sprinkler valve are a frequent cause of manual operation failure. To test, first, shut off the water supply upstream of the valve. Carefully disassemble the valve, noting the position of all components for reassembly. Inspect the valve body, diaphragm (if applicable), and all internal passages for debris like dirt, sediment, or mineral buildup.
Flush each component with clean water under pressure to dislodge any obstructions. Pay particular attention to small orifices and screens, as these are prone to clogging. A small brush or compressed air can aid in removing stubborn debris. Reassemble the valve, ensuring all parts are correctly positioned and seals are intact.
Slowly restore the water supply and observe for leaks or continued malfunction. If blockages were present, the valve should now operate correctly.

Electrical Component Diagnostics
Diagnosing electrical faults involves testing the solenoid, inspecting wire connections for corrosion, and verifying power reaches the valve; a voltmeter is essential.
Check for continuity and voltage to pinpoint issues preventing the solenoid from activating and the sprinkler system from functioning correctly.
Testing the Solenoid with a Multimeter
Utilizing a multimeter is crucial for accurately assessing solenoid functionality when a sprinkler valve fails to operate manually. Begin by disconnecting the solenoid wires, ensuring no power flows during the test. Set the multimeter to the ohms setting – typically 200 ohms – and touch the probes to the solenoid terminals.
A healthy solenoid should display a resistance reading, generally between 20 and 100 ohms, indicating an intact coil. An infinite or zero reading signifies a broken coil or a short circuit, respectively, necessitating solenoid replacement.
Next, check for continuity; a lack of continuity confirms a broken wire within the solenoid. If the solenoid shows appropriate resistance, proceed to voltage testing while the zone is activated, verifying power reaches the solenoid. A reading of 24-30 AC volts indicates sufficient power; absence of voltage points to wiring or controller issues.
Remember safety first – always disconnect power before handling electrical components!
Inspecting Wire Connections
Thoroughly inspecting wire connections is a fundamental step when diagnosing a sprinkler valve that won’t turn on manually. Corrosion, loose connections, or damaged wires frequently interrupt the electrical signal needed for valve activation. Begin by visually examining all wire connectors, searching for signs of rust, fraying, or breaks in the insulation.
Gently tug on each wire to confirm a secure connection; any movement indicates a loose wire requiring tightening or reconnection. Check wire nuts for proper sealing and ensure they aren’t cracked or damaged. Pay close attention to connections within the valve’s control box and at the solenoid itself.
Clean corroded connections with a wire brush or electrical contact cleaner. If wires are severely damaged, carefully cut back the insulation to expose fresh wire and reconnect securely. Proper wire connections are vital for reliable sprinkler system operation.
Checking for Power to the Valve
Confirming power delivery to the sprinkler valve is crucial when troubleshooting a manual operation failure. Utilize a multimeter set to AC voltage to verify the presence of electricity at the solenoid wires during the scheduled watering cycle. Ensure the sprinkler system’s controller is powered on and programmed correctly before testing.
If no voltage is detected, investigate the controller itself, checking for tripped breakers or blown fuses. Inspect the low-voltage wiring running from the controller to the valve, looking for breaks or shorts. A lack of power indicates an issue upstream from the valve, potentially within the controller or its power supply.
Test both sides of the solenoid connection to ensure a complete circuit. Remember safety precautions when working with electricity; if unsure, consult a qualified electrician.

Valve Specific Troubleshooting
Different valve types—diaphragm, poppet, and rotary—require unique diagnostic approaches; identifying the valve style is essential for targeted repairs and restoring functionality.
Inspect internal components specific to each design, addressing potential issues like diaphragm tears or rotary component obstructions.
Diaphragm Valve Issues
Diaphragm valves, common in sprinkler systems, rely on a flexible diaphragm to control water flow; a compromised diaphragm is a frequent cause of manual operation failure.
Inspect the diaphragm for tears, cracks, or hardening, as these defects prevent a proper seal, leading to no water flow even when manually activated. Debris lodged beneath the diaphragm can also hinder its movement, effectively blocking the valve.
Testing involves carefully disassembling the valve body (after shutting off the water supply!) and visually examining the diaphragm. Replacement diaphragms are readily available and relatively inexpensive. Ensure the new diaphragm is correctly seated and secured before reassembling the valve. A failing diaphragm often presents as a lack of pressure or inconsistent water flow, even with a functioning solenoid.
Consider that prolonged exposure to chemicals or hard water can accelerate diaphragm degradation, necessitating more frequent inspections and replacements.
Poppet Valve Problems
Poppet valves utilize a spring-loaded poppet that lifts to allow water flow; issues with this mechanism often result in a valve that won’t turn on manually. A common problem is debris becoming lodged between the poppet and the valve seat, preventing a complete seal or hindering the poppet’s movement.
Inspect the valve body for mineral buildup or corrosion, which can also obstruct the poppet. The spring responsible for returning the poppet to its seated position can weaken over time, leading to insufficient pressure and a leaky or non-functional valve.
Testing involves carefully disassembling the valve and examining the poppet and seat for damage or obstructions. Cleaning or replacing the poppet and spring are typical solutions. Ensure proper lubrication during reassembly. A malfunctioning poppet valve often exhibits a consistent lack of water flow, regardless of manual attempts to activate it.
Rotary Valve Malfunctions
Rotary valves, commonly found in larger irrigation systems, employ a rotating mechanism to control water distribution. When a rotary valve fails to operate manually, the issue often stems from internal wear or blockage within the rotating assembly. Debris, like sand or sediment, can impede the rotor’s movement, preventing it from aligning with the water ports.
Inspect the valve for physical damage to the rotor or its housing. A worn or broken drive mechanism can also cause failure. Lubrication is crucial for smooth operation; dried-out or contaminated lubricant hinders rotation.
Troubleshooting involves disassembling the valve, cleaning the rotor and ports, and relubricating the internal components. If the rotor is damaged, replacement is necessary. A rotary valve malfunction often presents as inconsistent water pressure or a complete lack of flow to specific zones.
Advanced Troubleshooting & Repairs
Complex valve issues may necessitate solenoid replacement, diaphragm checks, or valve body repairs; careful disassembly and component inspection are vital for successful restoration.
Proper tools and understanding of valve mechanics are essential for advanced fixes, ensuring a fully functional sprinkler system.
Replacing the Solenoid
When a solenoid fails, replacing it is often more cost-effective than repairing it. Begin by completely shutting off the water supply to the sprinkler system. Carefully disassemble the valve, noting the position of all components for reassembly. Disconnect the existing solenoid’s wires, remembering their configuration – a photograph can be incredibly helpful!
Ensure the new solenoid is compatible with your valve type (24V AC is common). Connect the wires to the new solenoid, matching the original configuration. Gently seat the solenoid into the valve body, ensuring a secure fit. Before fully reassembling, briefly test the solenoid with a multimeter to confirm continuity;
Finally, reassemble the valve, slowly restore water pressure, and test the zone. If the valve still doesn’t operate, double-check wiring and consider potential issues with the timer or controller.
Cleaning or Replacing the Valve Diaphragm
A damaged or dirty diaphragm is a frequent cause of sprinkler valve failure. Begin by isolating the valve and relieving water pressure. Disassemble the valve body, carefully removing the diaphragm assembly. Inspect the diaphragm for tears, cracks, or debris buildup. If debris is present, gently clean it with water and a soft brush – avoid harsh chemicals.
If the diaphragm is damaged, replacement is necessary. Ensure the new diaphragm is the correct size and type for your valve model. Carefully install the new diaphragm, ensuring it’s properly seated and sealed. Reassemble the valve body, paying attention to the orientation of all parts.
Restore water pressure slowly and test the valve’s operation. A properly functioning diaphragm will allow the valve to open and close smoothly, resolving many manual operation issues.
Repairing or Replacing Damaged Valve Bodies
Significant cracks or corrosion within the valve body often necessitate repair or complete replacement. Minor cracks might be temporarily patched with epoxy specifically designed for plumbing applications, but this is rarely a long-term solution. Thoroughly clean and dry the area before applying the epoxy, following the manufacturer’s instructions precisely.
However, extensive damage, particularly corrosion compromising the structural integrity, demands valve replacement. Disconnect the valve from the irrigation lines, noting the inlet and outlet connections. Install a new valve of the same type and size, ensuring proper sealing with Teflon tape on threaded connections.
Always test the repaired or replaced valve for leaks before restoring full water pressure. A compromised valve body can lead to significant water loss and system inefficiency.

Preventative Maintenance
Regular inspections, winterization procedures, and flushing the irrigation system proactively prevent valve failures and ensure optimal performance, avoiding manual operation issues.
Consistent upkeep extends the lifespan of components and minimizes costly repairs, maintaining a reliable sprinkler system throughout the season.
Winterizing Your Sprinkler System
Proper winterization is crucial to prevent freeze damage that can lead to a sprinkler valve failing to operate manually in the spring. Begin by completely draining the irrigation system of all water. This includes blowing out the lines with compressed air – a vital step to remove residual water trapped within the valves and pipes.
Disconnect the backflow preventer and drain it thoroughly. Insulate exposed pipes and valve boxes with appropriate materials to provide an extra layer of protection against freezing temperatures. Remember to shut off the main water supply to the system.
Ignoring this process can result in cracked valves, broken pipes, and a system that won’t function correctly when warmer weather returns, potentially requiring extensive and costly repairs. A well-winterized system significantly reduces the risk of encountering a valve that won’t turn on manually.
Regular Valve Inspections
Proactive inspections are key to identifying potential issues before a sprinkler valve refuses to turn on manually. At least twice yearly – spring start-up and fall shut-down – visually examine each valve for any signs of physical damage, such as cracks or corrosion.

Manually operate each valve to confirm smooth movement and proper function. Listen for unusual noises, which could indicate internal wear or debris obstruction. Check for leaks around the valve body and connections. Inspect wire connections for corrosion or damage, ensuring secure attachments.
Early detection of these problems allows for timely repairs or replacements, preventing more significant issues and ensuring your sprinkler system operates efficiently. Consistent inspections minimize the chances of facing a non-responsive valve during peak watering season.
Flushing the Irrigation System
Regularly flushing your irrigation system is a crucial preventative measure, often resolving issues that cause a sprinkler valve to fail to operate manually. Over time, sediment, mineral deposits, and debris accumulate within the pipes and valves, creating obstructions and hindering proper function.
Flushing involves opening the valve and allowing a high volume of water to flow through the system, dislodging and removing these accumulated particles. This process is best performed during spring start-up and fall shut-down. Check each zone individually, observing the water for any signs of debris.
Effective flushing can clear blockages that prevent the valve from opening or closing correctly, restoring optimal water flow and reducing the likelihood of manual operation failures. It’s a simple yet powerful step towards a reliable sprinkler system.

Backflow Preventer Considerations
Ensure the backflow preventer functions correctly, as malfunctions can impact water pressure and valve operation; check local codes for compliance and safety.
Understanding Backflow Prevention
Backflow prevention is a critical safety measure within any sprinkler system, safeguarding the potable water supply from contamination. These devices prevent water from flowing backward into the municipal water source, a situation that could occur due to pressure fluctuations or valve failures. Understanding how these preventers work is essential, even when initially troubleshooting a valve that won’t turn on manually, as a malfunctioning preventer can mimic other issues.
Several types of backflow preventers exist, including Reduced Pressure Zone (RPZ) valves and Double Check Valve Assemblies (DCVAs). RPZ valves are generally more robust and offer a higher level of protection, often required for hazardous materials. DCVAs are simpler and suitable for non-hazardous applications. Regular inspection and maintenance, as mandated by local codes, are vital to ensure proper functionality. A failing backflow preventer can reduce water pressure, potentially hindering valve operation and creating the illusion of a valve issue when the root cause lies elsewhere.
Checking Backflow Preventer Functionality
Checking your backflow preventer’s functionality is crucial when diagnosing why a sprinkler valve won’t operate manually, as reduced pressure can mimic valve failure. Begin by visually inspecting the device for leaks or damage. Observe the test valve; when opened briefly, water should discharge, confirming the preventer isn’t stuck. Check for unusual noises, indicating internal issues.
If you suspect a problem, a professional inspection is recommended. They can perform a more thorough assessment, including testing the check valves and ensuring proper operation. Ignoring a faulty backflow preventer not only compromises water safety but can also lead to fines and system shutdowns. Remember, local building codes often dictate mandatory testing schedules. Addressing backflow issues promptly can resolve seemingly unrelated sprinkler valve problems and maintain a safe, efficient irrigation system.
Local Building Codes & Backflow
Local building codes frequently mandate the installation and regular inspection of backflow preventers within sprinkler systems, directly impacting troubleshooting when a valve fails to operate manually. These regulations aim to protect the municipal water supply from contamination. Ignoring these codes can result in substantial fines and system shutdown orders.
Check with your local water authority or building department to understand specific requirements for backflow testing and certification. Many jurisdictions require annual inspections performed by certified technicians. A malfunctioning backflow preventer can create pressure issues that mimic a faulty sprinkler valve, hindering accurate diagnosis. Compliance ensures not only legal adherence but also safeguards public health and the integrity of your irrigation system. Understanding these codes is vital for responsible sprinkler system ownership.